When did the fashion of serving sandwiches and hamburgers stacked to high heaven become a thing? Frankly, I don't like to feel nervous eating one of those "sure-to-fall-apart" contraptabulationings.
[See like with words: K.I.S.S. "Keep It Simple, Stupid!".]
"The forms and techniques are important because they free attention from having to decide what to do next. But their purpose is to create space for presence, not to become objects of attention themselves."
"By providing a structure for movement and attention, the forms freed her from having to constantly decide what to do next, creating space for awareness to rest in immediate experience."
"But the structure must be held lightly as a container rather than as the content itself."
"When someone is authentically present, it creates permission for others to be present as well."
Listen to the selected segment of the story at time stamp 2:24:42
The suggestion to pick one regular activity and practice bringing complete attention to it offers a practical entry point for developing present moment awareness.
Rather than trying to be mindful of everything all at once, focusing on a single repeated activity allows you to notice the difference between distracted participation and full engagement.
The story ...
In a village at the foot of the mountains, there lived a tea master named Silto who was known for her exceptional skill. In the traditional ceremony, students traveled from distant cities to learn from her, drawn by descriptions of the profound peace that seemed to emanate from her simple tea preparation.
Her movements were fluid and graceful, each gesture deliberate yet natural, creating an atmosphere where time seemed to slow down and ordinary concerns fell away.
But Silto had not always possessed this presence and skill. Years earlier, when she first began studying the way of tea, she had approached it as she approached most things in her busy life, as something to accomplish efficiently so she could move on to the next item on her list. She had memorized the proper sequences of movements, learned the traditional forms, and acquired the necessary utensils and knowledge. Yet, something essential was missing from her practice. Her teacher, an elderly woman named Yukio, had tried various ways to help Silto understand what she was overlooking. But Silto was impatient with subtleties that didn't produce immediate measurable results. She wanted to master the ceremony quickly so she could begin teaching others and establish herself as skilled in this respected art.
One afternoon after Silto had completed what she considered a technically perfect tea preparation, Yukio made an unexpected observation. Your tea is correctly made. she said quietly. But you were not here while you made it. Silto felt puzzled and slightly defensive. I followed every step precisely. My attention never wavered from the proper forms. Your attention was on performing the forms correctly. But where were you? I was right here preparing tea. Yukio said nothing more that day, but she suggested that for the next week, Silto should prepare tea only for herself. Not for practice, not to demonstrate her growing skill, not with any goal other than simply making and drinking tea when she was genuinely thirsty. This suggestion felt almost insulting to Silto. She had been working hard to develop expertise and now her teacher was asking her to step backward into informal practice. But she respected Yuko enough to follow the guidance despite her frustration.
The first few days of this informal tea preparation felt awkward and pointless. Without the structure of formal practice or the motivation of impressing her teacher, Silto found herself rushing through the process just to have tea to drink. She boiled water quickly, used whatever cup was convenient, and paid minimal attention to the details she had been working so hard to perfect. But gradually, something began to shift. Without the pressure of performance or the anxiety of being evaluated, Silto started to notice aspects of tea preparation that had been invisible to her during formal study.
The sound of water beginning to heat, progressing from silence to subtle whispers to rolling boil. The way steam rose from the cup and how its warmth felt against her face as she brought it to her lips. the actual taste of the tea, which she realized she had often barely noticed while concentrating on proper technique. One morning, as she prepared her simple cup of tea before beginning other daily activities, Silto found herself moving more slowly than usual. Not because she was trying to be mindful or demonstrate presence, but because something about the morning light, the quietness of the house, the simple pleasure of warm tea on a cool day made hurrying feel inappropriate. As she poured water over the tea leaves, she noticed that her breathing had naturally slowed and deepened. Her usual mental planning for the day ahead had quieted. There was just the immediate sensory experience of warmth, fragrance, the gentle sound of pouring water. For the first time since beginning her studies, she was completely present with the activity of making tea rather than thinking about making tea or performing tea preparation. When she lifted the cup to her lips and tasted the result of this naturally mindful preparation, the difference was startling. The tea seemed more flavorful, more complex. But beyond that, the entire experience had a quality of richness and satisfaction that her technically superior formal preparations had never achieved. That afternoon, when she met with Yuko for her regular lesson, Silto shared what had happened during her morning tea. Teacher, I think I understand now what you meant about not being present. This morning, I wasn't trying to make good tea or practice correctly. I was simply making tea because I wanted tea and everything felt different. Tell me more about this difference. When I focus on performing the steps correctly, part of my attention is always evaluating how I'm doing, whether my movements are precise, whether I'm remembering everything properly. But this morning, there was no evaluation. Just the immediacy of water, tea, warmth, taste. Yukio smiled. And how did this tea taste compared to your most technically perfect preparations? Zero. Five. Much better. Not because my technique was superior, but because I was actually experiencing the tea instead of thinking about the process of making it.
Now you begin to understand the way of tea. The forms and techniques are important because they free attention from having to decide what to do next. But their purpose is to create space for presence, not to become objects of attention themselves. Over the following months, as Silto continued integrating this understanding into her formal practice, her entire relationship with the tea ceremony transformed. Instead of performing sequences of movements that she had memorized, she began participating in each gesture as it arose. Instead of demonstrating her knowledge of proper forms, she used those forms as a framework within which genuine presence could unfold. The difference was immediately apparent to anyone who sat with her for tea. The atmosphere that had been somewhat tense and performance oriented became spacious and peaceful. Students stopped feeling like they were watching a demonstration and started feeling like they were participating in a shared meditation. The tea ceremony is not about tea Silto would later explain to her own students. It is about using the simple act of preparing and sharing tea as an opportunity to practice complete presence. When you are fully here while making tea, the tea becomes a vehicle for awareness itself. Years later, when Silto had become a respected teacher, she would often share the lesson that Yuko had given her about the difference between performing presence and actually being present. Many students work very hard to appear mindful, she would explain. They move slowly and deliberately, attend carefully to details, follow all the prescribed forms with great precision. But this is not mindfulness. This is thinking about mindfulness while doing other things. True presence in any activity emerges when you stop trying to be present and start actually participating in what you're doing. It's the difference between watching yourself make tea and simply making tea. One is performance even if the audience is only yourself.
The other is participation. The way of tea became for Silto a daily practice that extended far beyond formal ceremony. She brought the same quality of natural presence to cooking, cleaning, conversation, and solitude. Each activity became an opportunity to return to immediate experience rather than living always one step removed in thoughts about that experience. This story reveals how presence is actually quite different from the concentrated effort that people often mistake for mindfulness.
Silto's discovery that her tea improved when she stopped trying to make it perfectly points to the difference between forced attention and natural awareness. When she was focused on correct performance, part of her attention was always split. Some awareness was on the immediate task while another part monitored and evaluated her performance. This division created a subtle tension that prevented full engagement with the experience itself. The informal tea preparation allowed her to discover what happens when attention is not divided between doing and evaluating doing. When the goal shifted from demonstrating competence to simply enjoying tea, her natural awareness could settle completely into immediate sensory experience. This illustrates something profound about how presence operates. It is not something you create through effort but something you allow by reducing interference. When the mind stops dividing experience into performer and performance, subject and object, awareness naturally becomes absorbed in whatever is happening.
The tea ceremony's forms and traditions served an important function once Silto understood their purpose. They weren't ends in themselves, but scaffolding that could support natural presence. By providing a structure for movement and attention, the forms freed her from having to constantly decide what to do next, creating space for awareness to rest in immediate experience. This points to something valuable about how contemplative practices work. Whether it's tea ceremony, walking meditation, or simple daily activities, external structure can support inner stillness. But the structure must be held lightly as a container rather than as the content itself. Silto's teacher understood that presence cannot be taught directly because it's not something you add to experience. It's what's already here when you stop adding mental commentary, evaluation, and projection. The week of informal practice wasn't a step backward, but a way of discovering what had been missing from all the correct technique.
The transformation in atmosphere when Silto began teaching from genuine presence rather than demonstrated knowledge illustrates how awareness affects not just individual experience but the quality of relationship and environment. When someone is authentically present, it creates permission for others to be present as well. Her insight about the difference between performing presence and being present applies far beyond tea ceremony. In meditation, people often work hard to appear mindful to themselves, carefully monitoring their posture, breath, and mental states. But this self-conscious mindfulness can actually prevent the natural absorption that emerges when attention settles into direct experience. The same principle appears in conversations where listening with effort to seem like a good listener is different from simply being interested in what someone is saying. It appears in work where trying to be mindful while performing tasks creates a different quality of engagement than becoming absorbed in the tasks themselves. Silto learned that presence is more like falling asleep than like lifting weights. You create the right conditions and then allow something natural to occur rather than forcing it to happen. When she stopped trying to make perfect tea and simply made tea with care and attention, presence emerged on its own. Both stories in this artifact point to the same essential teaching. Presence is not an achievement but a return. Not something exotic that requires special conditions, but the natural result of meeting whatever is happening with complete attention. The monk sweeping the path and the woman preparing tea both discovered that ordinary activities become extraordinary when met with wholehearted participation. Not because the activities themselves change, but because undivided attention reveals qualities of richness, peace, and connection that scattered awareness overlooks. This understanding transforms daily life from a series of tasks to be completed into opportunities for moments of genuine presence without needing to withdraw from the world or create special meditation schedules. Awareness can be cultivated through bringing full attention to whatever is already happening. The breath is perhaps the most immediate teacher of this principle. Each inhale and exhale happens only once. This breath will never occur again in exactly this way. When attention settles naturally into breathing without trying to control or improve it, the simplest act becomes a doorway to profound stillness.
The present moment is not a place to arrive but the only place you ever actually are. Past and future exist only in thought even when those thoughts are useful for planning or learning. But life itself unfolds only now in the immediate flow of sensation, breath, awareness. Notice how even reading these words is happening now. The understanding that arises from them emerges in present awareness. There is nowhere else to go to find what these teachings point toward. No future moment when presence will be easier or more complete than it can be right here. When presence becomes natural rather than effortful, daily life transforms without changing. The same activities continue, but they're met with increasing intimacy rather than distance. Work becomes more satisfying when engaged with full attention. Relationships deepen when presence is offered rather than just physical proximity. Even difficulty becomes more manageable when met directly rather than through the lens of resistance and mental commentary.
The pathway is already beneath your feet. The tea is already in your hands. The moment you've been seeking is always this one. Not because this moment is always pleasant, but because it's always real. And in that reality, stepped into fully lies the peace that thought can only think about, but presence can actually touch. The present moment asks nothing of you except presence itself. And presence asks nothing except willingness to be where you actually are instead of where you think you should be or wish you were. This willingness is sufficient. This moment is complete. This awareness is home. As we continue on our journey together, we arrive at something that touches every person who has ever tried to make something happen. The attachment to results. The way we pour our hearts into work, relationships, or dreams and then feel disappointed when things don't turn out as we hoped.
Note To Readers: This has been written by friend Wronski of "Wronski's Wramblings" on the Web. As stated in the boilerplate on the home page there, well, the gentleman "wrambles". Be advised. It's worth it, but it takes some holding onto.
Wronski writes ...
I cooked a big hearty meal for my birthday yesterday, August 31. "Pot-au-feu." It's very basic cooking, but uniquely delicious at the same time. I could have had a Steak, Sushi, a big Thali. I cook what I have on hand, shop for what I might like to cook in the future; of course, also shop for what is needed in the pantry. I saw a photo image and just got the notion to cook up a pot of what was on hand. Turns out, everything called for; one small exception. I'll mention it later, no big deal. Turned out just like it looks in the photograph above. Tasty. The broth mysterious. I get to that later too, very surprising.
So, here's the deal ...
It's the quintessential Peasant dish. You got a fire. You got a pot. You got some biddles. That's the dish!
You could make the case that Peasant cooking is the most sublime. Close to the source sort of idea. And, just things tasting like the things taste. Who's so up to here with all the multi-spiced and flavored "innovations"? Don't get me started on how you're supposed to eat a Hamburger what's six inches up off the plate!
You could say, hey, that's just a soup ... or, a stew! Sure. Of course. But, those French! "Pot-au-feu." They have to go and make it a thing. If you want to understand the French, just consider the Eiffel Tower. What's it for? Who knows. But, isn't it loverly.
Okay, so what's the thing what makes it "Pot-au-feu". An assortment of rootish type vegetables. Potatoes, Carrots, Onions, and some sturdy partners such as Cabbage, Celery and Leeks. Some sweet Peppers if you got 'em. You could put in a Fennel bulb and Celery or Parsley root too.
Meat. Apparently the dish is based on using an inexpensive cut of beef. "Peasant." Also a hunk of some fatty smoked Pork piece and Sausage. You may have noticed the "...ski" at the end of my surname, so you can guess the kind of Sausage what's in mine.
But, here's the kicker. That Onion? You stud it with whole Cloves. It's referred to as oignon piqué, "pricked Onion". The Clove flavors the broth in a kind of catalytic chemistry. Raison d'etre — even those slurpy French like to keep things tidy ... The Cloves studded into the whole Onion are easy to remove; as opposed to bits and pieces floating in the broth. So Ladies, if hubby is a bit of a "prick" give him the chore of sticking it to the Onion. It takes some muscle. And you should be only doing the dainty kinds of things in the kitchen anyway. Am I right? Or, am I right! [That's some post-feminist humor, so don't get your panties all up in a bunch over it.] [That's what's called "double tap" humor.]
Put it all in a pot with lots of pure Water. Cook it until the Meat is tender. If, like in my dish, you're not including something Beefy, then cook until the vegetables are tender. The smoked Pork thingy and the Kielbasa are only needing to be heated through; usually come precooked.
So that's all's there is to it. BTW the broth enriched by the Pork is distinctive for also having that waft of Cloves on the palate. Very alchemical. I'm not a big Clove fan, but in this dish with those plain vegetables, it works. It lingers. Like a post-coital glow on a lazy afternoon in a tucked away Parisian neighborhood in an attic apartment overlooking the city, with the Eiffel Tower in all it's erect glory. A big ol' ashtray with a coupla packs of Gauloises. Maybe some nice Armagnac.
I wrote recently about all the fuss over Coffee. Origins, varieties, home equipment, processing, tastings.
Sounds like a short list. Think again. Multiply each of those basic categories by a factor of let's say 100, and I give you the kaleidoscopic cornucopiatastic world of "COFFEE". From one vantage point the whole thing looks like a democratic take on what the "Wine World" has been doing from quite some time. Only with Coffee, it's more accessible to more folks. "Mulla, hulla." Wine snobs, Coffee snobs ... what's the difference?
That last point, accessible to more folks, is arguable. If you read my previous missive [linked below] you'll understand that the quest for that just right, Goldilocks cup of Joe can get pretty, pretty, pretty high up there. In terms of what's entailed, and certainly in how much you can spend to get there. And it's not like there's that one cup of Coffee that you finally find and settle with at the pinnacle of the climb to perfection. There are so many variations that one can become a connoisseur of the differences and distinctions. If you search you'll see a lot of Coffee people online have batteries of all sorts of equipment in their kitchens. The lexicon of taste, color, and texture variations is as dense as it is for wine.
So, where is Cooky Cat now in this maelstrom on the caffeinated hunt?
Seems that the basic next step in upping the Coffee game is the grinder. Enough on that subject already online, so we won't be rehashing things. Suffice to say that the size and shape of the ground Coffee makes a difference.
Your Boy here has mostly been content with a cup of Coffee. Pour overs and Moka pots mostly. French Press, Cowboy style [Chorreador]; that last one for large batches. With a $20 blade grinder. No complaints.
Then I got the bug. If I trade up will I get that better cup? As I'm typing this I'm awaiting the arrival of my new Coffee grinder. Hand grinder. Why by hand? In Coffee World an electric grinder is considered "budget" all the way up to the $500 price point. No kidding! And when doing the comparisons it's easy to price yourself up to the the next better level. Seems there's a major divide between units that deliver for espresso, and those that perform more for the coarser settings. If you're really into it you have a device for both. At least.
The one concern on my new hand grinder is the grinding itself. I'm preparing for just one cup, so the grinding should be under 30 seconds. One of the beauties of the hand units is burr grind speed. It's a thing. Electric units spin at high rpm's bringing some heat into the equation. Obviously, cranking by hand doesn't have that issue. Don't want to over excite those tender beans.
So, what did I buy. The Timemore S3. $159.00. Wow! You say. I know. I traded up a bit. There are some good units under $100. I opted for the one with an easy and quick collar adjustment. And, like I said, you get to $100 what's a few more? The other contender was the 1Zpresso J at $139.00; larger conical burrs; 48mm versus the Timemore at 42mm. But, the adjustment ring was the deal breaker along with the Timemore having 15 microns particle size per click versus 25 microns per click; more precise. The crank handle collapses, and that makes storage so much more efficient.The price spread ... hey, if you're gonna get wet, what's a little more water?
What next?
I've also been looking into roasting my own Coffee beans. I'm putting that off for now. The main qualifier is this: just how much better can it get given that the unit I'm considering [the Hive Roaster with digital temperature reader] comes in at nearly $200. And it takes about 10 or so minutes of constant shaking the hand unit over the stove to get those green ones to be "has beans"; that is, roasted and ready to grind.
Enough for now. If my universe shifts again, I'll update you. Don't hold your breath.
By the way, I'm thinking of springing for some Jamaica Blue Mountain Coffee. The best cup of Coffee I ever had was at a small hotel in Montego Bay located on the road to the beach. Had to have been Blue Mountain.
Blue Mountain Coffee runs nearly $65 per pound from what appears to be an excellent source. Lothian Coffee. At that price it also nudged me to up the quality on the grinder. You dig my thinking?
They also sell green beans at $49 per pound. That's where I got the idea for roasting my own. At such steep pricing you don't want to have already roasted beans laying around and getting stale. I know, there are vacuum cannisters. Yet another something or other.
And, right now as I'm about to pull the trigger and publish this my new grinder just landed on the porch. With — OMG I'm becoming one of THEM — a mister to give a bit of a spray to the beans just before grinding. It keeps the retention — stuff still in the grinder — down. Spraying Coffee beans before grinding is a technique called Ross Droplet Technique [RDT]. It reduces static electricity for a cleaner grind and less stray grounds.
Addendum: Made my first cup of Coffee grinding with the hand grinder. Medium dark roast. Quantum step up in flavor quality. Before with the blade grinder the flavor was "confused", not clear; with a lot of different things going on. The more consistent grind brings the flavor to a unified whole. Lots of punch. I'm not versed in more florid/floral descriptions; just to net net ... the grinder does make a difference. Big. May have to dial back on the amount I'm using. Following, by the way, the 1:15 ratio; 20 grams of Coffee, 300 grams of water.
That's when you are cultivating a pampered palate and take having a nice hot cup of Joe to the Nth level and make a Tea Ceremony ritual of it, procedurally and with the never ending quest for all the equipment and paraphernalia that's being marketed for you to part with your cash. Let's not even get started on the choices from the world of beans. The best cup of Coffee I ever had was in Jamaica; probably Blue Mountain. At around $100 USD per pound, sorry, just how good do I have to have my Coffee? Price/value dialectic.
Like take, for instance, Coffee grinders. Electric or hand ground? Price point? Seems "entry level" electric is close to $200 USD. There are even $200 plus hand jobs too on the high end of manuals. Not to belabor the pun too far, but after all the time invested in turning a hand crank for your result, it might not be such a happy ending.
Consistency of grind — size [matters] varies depending on brew method — is a big factor. Maybe I'm not that much of a Coffee A-hole ... I'm pretty well satisfied with the grind I get with my $20 blade unit. But, I do watch for how long I press the button, and give it a few shakes in between pulses to get all the particles done to uniform size.
I would be tempted to buy an electric grinder. But, when you investigate the options, it's very easy to trade yourself up to the next ... and, the next pricier unit. Conical vs. flat burrs. And, what size. "Retention" ... how much grounds does the unit keep for itself. I generally step back at such a point and consider how many actual coffee beans I could buy for that price. I'll stick with my blade gizmo. Besides, I'm not inclined to do the multi-dimensional palate taste report. "Berry-Orange notes forward, with a hint of Chocolate and Caramel with just the right snap of acidity, finishing with a nice slightly bitter note of burnt Sugar."
Don't give me no jive ... give me a cup of Coffee!
Starbucks, nota bene: "Vente?" That some jive. When I used to go to Starbucks, since I like a good amount of Milk, I'd order a Grande in a Vente cup. [If you're getting from how I'm focused on price, you might think I'm a cheapskate. And, you'd be right.]
But, when I mention "entry level" at $200, the numbers go up quickly from there. The real bucks are in the units designed for Espresso. Let's not go into that thicket of techniques and equipment. Net net, seems you can easily spend at least $1,000 on a half decent Espresso set up. Half. You better be a heavy user at that price point. Or, some Asshole who likes to impress the company. Or, have money to burn.
Which reminds me to convey to you there's the world most expensive and rare Coffee. Kopi Luwak. They literally get it out a cat's ass. I shit you not. And not just any old pussy, but a rare Coffee cherry-eating feline; one Asian Palm Civet to be exact. Talk about bustin' a Cherry! Seems these cats are fussy too. They are picky about what Coffee cherries to eat. Apparently the beans are fermented in the kitty's digestive tract. Thoroughly cleaned for your drinking enjoyment. Let's hope the guy cleaning the shit off your beans that day didn't have a row with the old lady last night. Or, quite the opposite; in which case he might be too pooped to do the poop.
Interested? $650.00 USD per kilo. No shit! At this point I simply have to ask once again, just how good does a cup of Coffee have to be?
The world is full of "the best of" this-or-that's. Like once someone talked about the "best" Burrito. My question was the same, just how good does a Burrito have to be? It's probably a subject worth a doctoral thesis: "The Mindset That Gets You Going down the Rabbit Hole to Perfection." I was once "into" high-end audio. Did you know you can spend $100,000 plus USD on speaker cables?
Okay, we've had our fun. Now back to the topic.
I have to confess I've watched hours of instructionals on how to brew coffee; the various brewing methods, and the equipment requirements whereof. Maybe watching all those videos is a Rabbit hole itself.
When I want a punch, it's Bustelo, in a Moka Pot. Cafe con Leche style with hoted whole Milk and a spoon of Sugar. There are still probably lots of spots in my once hometown NYC to get a good Cafe con Leche at any number of Puerto Rican and Dominican restaurants.
Props to my go-to favorite ...
Alas, no more. Formerly at near the NE corner of 8th Avenue and 14th Street.
Mostly, my morning cup is a pour-over. Fresh ground in a cone shaped funnel, water poured over and collected under into a carafe. Be sure to make a divot in the center so the water gets to the bottom-most grounds. Precisely measured amounts of Coffee beans and water. Beans ground on the spot, with a dash of Bustelo for the win.
I like my "cuppa" hot. If you've ever done a pour-over you know it takes a while. First, a "bloom" with a dash of hot water — better be sure it's the precise right temperature. The "bloom" is to release trapped carbon dioxide for a better brew. Wait a few minutes, then slow pour your hot water. I get a 300ml amount that fills my cup and pour it in three 100ml passes.
I always wonder with all the various ways people have for doing a pour-over no one mentions the temperature fall off what with waiting so long for to get that brew into your cup. Some, I believe prefer drinking their Coffee at a less than hot-hot level. I'm sure there's a whole specialized discussion on just that one topic alone.
So ... here's what this Coffee A-hole does beside the basic steps what to get a nice hot cup of Coffee.
I set the kettle to heat the water. In a shallow pan I heat water with a carafe with some water in it. The pour over funnel goes over the heated carafe — be sure to toss the hot water out of the carafe before introducing the beverage. I've missed this point a few careless times. Ugh! I like a middle-generous amount of whole Milk in my Coffee. I put hot water in my cup and a small glass inside that to heat the milk. Works like a charm: Hot Coffee in my cup!
Read this and you'll know all there is to know about preparing Fried Rice.
We've prepared Friend Rice often enough and seen often enough videos by real Chinese Chefs to know from what-the-what.
BASIC FOUNDATION: Stir fry to heated-and-oil-coated some cooked Rice. Some say left over Rice; we say whatever. Props to Ming Tsai on the latter. Make a well and add some beaten Eggs. Let Eggs set a bit, then mix to combine. That point varies according to which Chef you see. Heck, you can even scramble the Eggs separately if you want. Classic traditionalists will probably want to stir fry together all at once to coat the rice with the Egg. You decide. We like the contrast.
NB: Separately and before the Rice/Eggs get together, stir fry your mix-ins.
MIX-INS: Whatever you like and have on hand. Color and texture are virtues to be sought. Keep the cut size of your add-ins smallish. There's a textural homogeneity we're going for, don't you know. [See delicious photo above.]
We always like the crunch of thinly shredded Cabbage. Fine diced Celery. And, Sprouted seeds/beans. Mung Bean sprouts are usual. We use Fenugreek seed sprouts as also seen in the above photo.
In the preparation pictured there is a mélange of finely chopped ... Zucchini, Onion, Corn, Shiseido Peppers, Tomato, fresh Pineapple, Ginger. Shrimps and a Hot Dog. [On the latter, it's a take home from a neighborhood BBQ. We're not cooking for the Queen after all.]
FLAVORINGS: Seems Oyster Sauce is rather a usual element. Optional though. Some Soy Sauce too. For a luxurious touch, toasted Sesame Oil. We bring hot Chili Oil to the table. To your taste.
GARNISH FINISH: For us it's not what we want to see on our plate unless there's plenty of thinly sliced Scallion and chopped fresh Cilantro.
SUMMARIZING: Cooked Rice and Eggs. And ... whatever you like.
2/18/25
Cooky Cat Home Page
When it comes to cooking . . .this Cat can Cook! Very Cooky!
BOILERPLATE
The Internet is full of cats these days. Here's a Cat among cats. The one who put the puss in his boots. The very one whom the Ad Biggies referred to when they said, "let's put it out on the back stoop and see if the cat licks it up."
Cooky Cat cooks from scratch. (No claw-related pun intended.) You’ll find not so much recipes, as suggestions. The world, after all, doesn’t need another cook book. A certain culinary skill is expected to dig this cat.
Inspiration is what is needed. And Cooky Cat brings it. A sense of humor also wouldn't hurt. He kids... but, always, he loves. In his own words, "Just kitting."
We give you... Cooky Cat!
The Cooky Cat is into cooking. He can be a playful kitty, sometimes prone to exaggerating the facts (he can be a down right fibber), but always true blue when it comes to steering you in the right direction kitchen-wise. Take what he may say otherwise with a grain of salt. Just shoe him off your lap(top) when he gets too frisky for you.
Cooky Cat can cook anything (he is not vouching for its edibility, however). Don't expect recipes and treatments on the more conventional dishes. [E.G., regarding omelets... Wisk a few fresh eggs, shake and stir in a pan with some butter, fold onto plate. Done. Next.]
Cooky Cat is also very straight ahead in the kitchen. No stunt foods. So don't expect any of those trendy piled high ego displays or cakes made to look like... whatever. Take this pledge: "I will never again watch a cake show on television." About foam... you can't even get him anywhere near the foam of a bubble bath. And, as few gadgets as possible. It took him years to get around to a Cuisinart processor; prior, it was the trusty Benriner mandoline.
He also vigorously eschews the trend to overly combine wildly disparate ingredients or overly sauce and/or multi-spice recipes. Things do have their own taste and Cooky Cat stands for letting the ingredients speak for themselves.
His motto: Create meals from what looks good at the market, always looking first for what is seasonal, fresh, and local. Shopping to a recipe is a way to go, but many times slavishly sticking to that approach can be frustrating if you can't find the ingredients; it forces compromises if what's only available is of lesser quality, and it is certainly the most expensive approach. Quality costs, and pays off in the long run; but when it's on sale, go for it. By and large, you get what you pay for.
There have been comments from certain quarters that the recipes are not detailed enough. The point Cooky Cat is making has to do with conveying the secret ingredient to all good cooking. If you want the specifics, just do a search and zillions of options magically appear. To repeat, the world does not need another cook book!
Now go ahead, scratch around and see what Cooky Cat has for YOU!
A faithful follower of Cooky Cat shows her appreciation. . .
This here is not gonna teach you about the particulars of making a nice cup of Coffee. It's just to give you the lay of the land. It's a scenic route. It'll help you plan your trip. Guaranteed.
But, first ... a little something relating to the price of Coffee in the news.
Recently in the news Coffee has been a thing. The geopolitical effects on price, that is. Seems the country of Columbia had refused to accept deportees from the US of A under the new Donald J. Trump Presidential program to deport migrants who had entered illegally. First to go, the bad hombres. With a threat of tariffs as the cudgel to change Columbia's mind the prospect of the rise of Coffee prices had been a concern. Briefly. Seems Columbia has changed its tune and is now accepting airplane loads of their nationals deported from the US of A.
As a complete aside ... wondering what Columbia and other countries are gonna do with those folks. Many of whom may be hardened criminals. Just saying.
Good news! The price of Coffee will stay level. At it's already whopping high. You want a pound of Jamaica Blue Mountain? Around 90 bucks. Okay, that is the high, high end. But $10 to $20 per pound for a good quality Coffee is the norm.
And, don't even let's get started on the similar high price of a type of Coffee what beans come out of a cat's ass. Coffee connoisseurship has gotten so granular of nuance that I bet there are even some who can tell the difference between what cat the beans got pooped from. Just discovered there's a plantation offering Civet coffee from "wild" cats. It sells for the wild price of $399.00 [US] on Amazon. Apparently, according to the producers, the wild cats — 2800 of those little buggers at last counting — are free to consume the beans of their own choosing. Now that IS granular! And, to make the point on how "Coffee" is the new Tea Ceremony, there are probably some who can tell which clan of cats their brew hints of terroir. To this Cat, a cat's ass is a cat's ass.
Everything price-wise is higher. Stock up on Eggs. We have a fancy fromagerie in town and $36 dollars for a pound of Cheese isn't all that rare.
Remembering a time when canned Coffee came in 1 pound cans. And, about a dollar per. As costs do, they rise; prices rise. To offset the sticker shock the can sizes became smaller; now the small sized cans contains 11.5 ounces. Kripes, a 10.3 ounce can of Maxwell House Coffee at $8.49 scales up to $13.47 per pound. So that's the going rate for Coffee as a general benchmark. And, mind you, that's a can of store Coffee. Geez!
Whew! Who said the only constant is change.
Now let's get to the topic of "Coffee".
Once, in the day, our idea of making Coffee was a plastic Melita filter funnel balanced precariously over a large antique enamel kettle. Put in some ground Coffee from a store boughten can — be sure to include a scoop of Bustelo for that extra sabor — then dump in the boiling water. Wait for it to drip through completely, and serve.
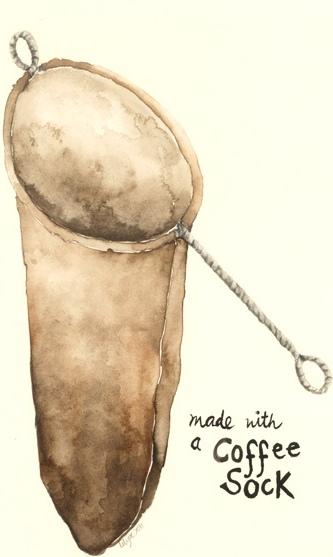
Now, things have evolved. We have at our disposal a few different methods. A Coffee sock. A couple of Moka pots. A classic Bodum French press. A few single serve drip Vietnamese gizmos. And, very recently, a Hario V60 pour over drip funnel.
The Coffee sock [Calador in Spanish] is a lot like "Cowboy Coffee". You boil water, add grounds to the pot, let stand a bit, then pour through the Coffee sock into a decanter.
We hear Cowboys use their hat. Actually, after the Coffee sits in the pot of water to extract, we usually just let the Coffee drip into a bowl, rinse out the brewing pot, then put the finished Coffee back in the pot. Make sure it's hot, then pour a cup; have the rest on the heat for a second helping, or to reheat later.
Yes, I said "reheat". We know, that's like a mortal sin in the current Coffee zeitgeist. To each his own.
We also have a fancy design stainless Moka pot and a smallclassic Bialetti for a small Espresso to go into our favorite Café con Leche.
And by Café con Leche we're talking about a good strong shot of Espresso with a load of steamed milk, sugar to taste. Not a $4+ "Latte" with foam on top, or a Cappuccino with the foam AND a dusting of Cinnamon. And, please, no pictures floating on top of my cuppa. Geez!
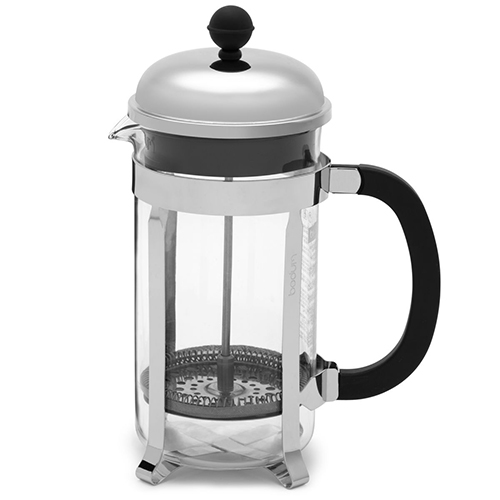
Then there's the French press ...
French press is great. As long as you drink it all after being brewed. Anything less, then you'll have to transfer into a pot to reheat; or, just leave it for later for an iced Coffee.
On occasion we'll use a fine grind and set up our Vietnamese phin drip filters. We prepare our drink iced as shown, sweetened in the classic way with sweetened condensed Milk. Strong and a real treat. [Photo from casa Cooky Cat.]
The latest is a Hario V60 drip funnel.
Ceramic, please. Better to hold the heat. Along with the V60 we went economic and use a Hario Drip Kettle Air.
It's just a small pitcher with a spout designed to give a slow, precise pour. We said economy. The other way to go is a specially designed kettle with a gooseneck spout for that precise slow pour over action.
Then, of course, there's the choice of stove top heating or dedicated electric kettle. If you are using such a kettle then you'll need a scale under the drip rig to measure a precise proper amount of water. The V60 Drip Kettle Air has markings to show the amount of water. Less than $16 bucks versus the $100+ [at least] for the kettle/scale setup. And, that's the entry price. You can spend way more.
Then there's the thing about the water to Coffee ratio. You can spend hours going over that subject alone. Not to mention water temperature. Then, there's how you pour for a pour over, and how fast. Geez! That's just the on paper side of the research. In the kitchen, where the rubber meets the road, then there's adjusting it all to your taste. Heck, they have competitions on Coffee making. And, no shortage of opinions.
As you might be getting by now there's a lot of variables to making Coffee. All the foregoing is already a whole bunch of words. But, believe it, that's just the tip of the iceberg. We'll get to that. Not to nail it all down, chapter and verse. But to give you a snoot full of all there's to Coffee in this year of 2025.
Also, you may surmise, that getting a hot enough cup of Coffee to your lips what with all the machinations in the brewing is a thing in itself. Our preparation method includes preheating the cup, and preheating the added Milk. With the pour over filter funnel we're also using a carafe that we can keep over a heat diffuser on the stove while we're going through the pouring motions. Careful, those glass carafes aren't supposed to go on direct heat. Only microwave. But we don't microwave. Bad vibes kind of thing.
Addendum: Instead of the heat diffuser for the glass carafe, we've switched up to filling the carafe with hot water from the tap and getting that carafe hot by cooking it in a shallow water bath. BUT ... remember to toss out the hot water in the carafe before doing that pour over. Otherwise you're gonna have a thin brew.
By the way, we picked up a while ago the idea that Coffee should be poured into the Milk. [If you take Milk with your cuppa, that is. Or Half and Half, or Cream.] We'd discuss this more, but looking for an easy answer in an Internet search it's too much of a Rabbit hole. So we take it on faith. There seems to be some chemistry science basis to it. If you want to know more, go fetch.
So currently at casa Cooky Cat we're in the initial phase of dialing in the variables for the pour over method with the Hario V60 funnel. Coffee to water ratios. Water pour total amount, timing, and proportionings. And, the big one ... the grind.
The grind size and grinding method of the Coffee beans is a major thing. Differing grind size for each type prep method. And, be sure the grounds are uniform. That's where grinders come in. A mortar and pestle ... please! F NO! That would be a regular every day no; unless you live in a cave. We've been using an electric blade grinder. Works well enough. But grind consistency is not a big point with that random type spinning blade action.
There's a world of grinders, each type and each model with their various pros and cons. So many choices, so many price points. When you're into Espresso, the grinder choice is a big deal. Espresso prep has umpteen variables, and more than that ways with it.
Hand grinders. You'd think that it's a good economic trade off. You work more, but it costs less. There are inexpensive hand grinders [$50-ish.] But, a top rated hand grinder will set you back $250! For reals. Electric-wise, seems the bottom "entry level" like the top rated Baratza Encore goes for $150. Or, $200 if you want the version with the upgraded grinding burrs for Espresso.
"Burrs." There are conical burrs and flat burrs. With design differences within each range, and critical reviews till the cows come home on the differences in the cup. There also seems to be no price limit. You can easily drop $500 for a "decent" unit.
"Entry level." That phrase rides through all the reviews of Coffee paraphernalia. It always strikes us the term "entry level" typically goes along with a steep enough price tag to make us want to throw up our hands and just toss some grounds into a percolator.
Speaking of percolators. Once in my checkered career resume I did time as a Can't Miss Top 10 Mad Ave Ad Biggie on a Coffee account. The Pan American Coffee Bureau in New York City gave an introduction to all things Coffee. The take away point I remember was how they were emphatic that the drip method was the best. I brought that up to my client counterpart brand manager. He pointed out that percolator sales were increasing. In other words, it would not be productive sales-wise to include drip method in our advertising. Much less promote it. This was in the mid-1960s. Then, guess what? Mr. Coffee came along. Changed the game. Drip Coffee in an appliance. Turns out that no one was against drip method Coffee as such. They just wanted it in an appliance. Gizmos sell.
We once gifted a Coffee sock to a dear one and they turned up their nose not wanting to change from their single serve pod brewing device. Gizmos. [Pretty soon the hand will only be useful for punching in text messages. And, of course, hand jobs.]
And, speaking of devices ... Espresso machines. One blanches at the mere thought of having to tackle that subject. Sure you can get an Espresso machine for around $100 bucks. But, when you research all the variables, seems a good entry level unit might be nudging toward $500 dollars. And, how much Espresso are you gonna drink for that price tag when you drop 5 bills and still feel like you're a piker for not springing for the $1,500 dollar unit which seems to be what the aficionados plunk down. And, that's "at least".
That'll get you started for Espresso. Then, of course, the grinder. And other stuff too. For Espresso, the unit what holds the grounds in the machine. It's called the portafilter and there are options there too. And, no end of considerations and discussions of opinions. And, once the grounds are in the portafilter they have to be 1. raked over for evenness, 2. tamped down first to level, 3. then pressed down to a torque wrench pressure precision. A good Barista can do it by feel. But, of course, there are the ones with a spring drive preset load pressure. Lots of gizmos to do all that.
And, by the way, time, temperature, and pressure are the alchemist's plaything when it comes to Espresso. Like was said ... variables.
If you've even got this far into this writing you have to get by now that Coffee drinking is a big thing. Ritual thing. After all, how good does a cup of Coffee have to be? Seems for many it's a quest.
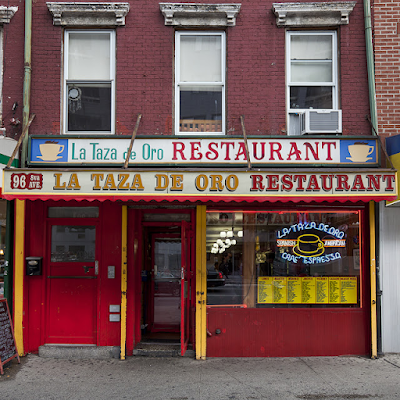
But, it can be good. Really good. My best taste of the brew was when vacationing in Jamaica. Must've been Blue Mountain. If we ever get our Coffee ritual dialed in solid, maybe we'll spring for that $90 dollar bag of Blue Mountain Coffee. Second best cup of Coffee, room service at a hotel in Roma, Italy. Third best, from many of the Dominican and Puerto Rican restaurants in New York City and their incomparable Café con Leche. Fondly remembering a now gone favorite, La Taza de Oro ["The Golden Cup"] on 8th Avenue at 34th Street in New York City. In the day the Espresso station was right up near the front door with a dedicated server cranking those paper cups of Café con Leche non-stop. 75 cents per; maybe never more than a buck.
Just try to go to one of those au courant Coffee shops and order one of those. They don't get it. More often than not they'll give you that $4+ Latte.
Right up there also, Siddha Coffee. A rich sweet, milky brew laced with lots of Cardamom as served in the Amrit ["The nectar that promises immortality"] at Siddha Yoga ashrams ... Nectarian. Divine.
Net, net ... maybe it's best to leave it with the wisdom that reminds us that you never put your hand in the same river twice.
No two cups of Coffee are ever alike. Even with the same Barista. I used to run errands for a non-profit school and my work partner and I would make our first stop a Café con Leche. He would often taste that day's cup and comment on whether the Barista was on their game that day. Hey, it's an alchemical thing. You bring your magic into it.
And, net, net, net net ... maybe after all is said and done, you end up just saying, "Don't give me all that jive, give me cup of Joe!".
PS If you're thinking that you didn't find out how to brew a cup of Coffee from all this ... well, you'd be right. This here article is just to tune you up to the kind of weather and terrain you'll be facing when you put your boots on and start marching toward that "grail cup" of Joe. Or, maybe it puts you off enough to not bother, and just plug in an auto brew machine. Or, something in between. Or, maybe in the low to middle range. Or the middle to top range. You get it. Kapische? Choices, huh?
PPS We didn't discuss the beans. We'll leave that as "has beans". The subject of Coffee beans can fill a library. Many different countries produce Coffee beans. Locales in each vary. You know, "terroir". Different producers. Then there's roasting. Light to dark, and in between. And the flavor profiles of each. Full bodied or light. Flavor notes of all kinds. [Do not become a Coffee snob, waxing poetic for all to witness all the deep flavor discriminations you can find in any one cup. Please!] Acidity. Finish. Sorry, on that subject we're finished. Go fetch. Last analysis, you'll just have to try them for yourself. You can stick with your final favorite, or Tango on sampling the world of Coffees. [By the way, did you know there's an Ethiopian Coffee — "Kopi Luwak" — the beans come out a Civit Cat's ass with its poop? No shit!]
PPPS Oxygen is the enemy of Coffee. Check out the subject of storage, and storage devices. Vacuum sealed seems to be the ticket.
BASTA!
Lucky strike extra! In case you are not up on the nuances of Coffee brewing, here as just one of the so many instructionals on just one type of brewing method, two different gizmos:
On this website there have been two previous iterations of Kimchi recipes. This is our latest understanding, so don't refer to those others. Those versions are appended with a redirect to this hard-won wisdom-gained recipe.
[The understanding that changes the previous recipes is based on a reduced use of Salt*. In the initial steps the Napa Cabbage and Korean Radish/Daikon are salted and left to stand to wilt. This is all the salting needed. The vegetables are thoroughly rinsed after they are Salt/wilted and ferment just fine without any further addition of Salt*.]
This is how it's done by us now ...
[The yield is about a gallon's worth. 4 quart jars/two 2 quart. Scale down by half if you like for your first outing.]
Get yourself the following ingredients:
— 5 or so pounds Napa Cabbage
—2-3 pounds Korean Radish or Daikon
— 1 Cup Kosher, or other non-iodized Salt*
—3bunches Scallions
—2 inch piece of fresh Ginger [more, to taste]
— 2-3 cloves Garlic [more, to taste]
A slurry/porridge combining:
—2 Cups Water*
—2 Tblsp. Sweet Rice Flour, or All Purpose Flour
—2 Tblsp. Sugar. [You choose what kind.]
1 Cup Korean red Chili flakes/powder
[For less a spicy result substitute sweet Paprika for the Korean Chili powder.]
[Optionals ... but very nice]
— 1 Cup matchstick cut 1 large Carrot [optional]
— 1 nice handful bunch Chinese Chives [optional]
— 1-2 bunch Watercress [optional]
* IMPORTANT: Use Kosher or other non-iodized Salt. Iodized inhibits fermentation. Use pure water for the final rinse ... Chlorinated tap water also inhibits fermentation. [Tap water can be boiled to remove the Chlorine.]
Preparation:
Cut the rinsed Napa Cabbage lengthwise into 6 portions. Cut the core itself into small pieces. Cut the leaves crosswise into 2" sections.
Cut the peeled Korean Radish/Daikon into whatever shape you like. Quarter rounds 1/2 inch thick. Cubes, or sticks.
Place the Cabbage and Radish pieces in a large bowl and mix well with the Salt. Let stand 3-4 hours, or overnight.
Heat the Water/Flour/Sugar mixture over low heat, stirring until blended and a smooth thickened slurry. Let stand to cool before adding next ingredients.
Rinse the salted Cabbage/Radish well, three times. The last [3rd] rinse use pure Water. No Chlorine, please.
Cut the Scallions into 1 inch pieces on the bias. [Cut as you like ... smaller; or, even smaller.]
If using optionals ... cut: Carrot into 2 inch matchsticks. The Chinese Chives 2 inches. Rough chop the Watercress.
Prepare the Chili paste: combine Chili flakes/powder, minced Ginger, minced Garlic with the cooled slurry.
Combine and mix well to distribute Cabbage, Radish, Scallion, and whatever other optional vegetables.
Mix to thoroughly combine vegetables and Chili paste.
Pack into a large jar(s). We make this recipe with the proportions as listed. With a gallon size jar. Use quart or 2 quart size jars. Graduate to the gallon size when you're sure Kimchi is gonna be a staple.
IMPORTANT: Fermentation is anaerobic. No air. Create an air lock ... Leave 2 inches head space in the jar(s) and insert a clean plastic bag into the space. Fill with water up to the lid with 1 Tblsp. Salt [it's a brine back up should the plastic bag break]. Tie the bag tight. This will create an air lock. It's also easy to remove since you'll want to keep track and taste the Kimchi as it ferments. If you have a fermentation crock, you go.
Let it stand for 3-4 days at room temperature. Check daily. There is no rule you have to follow. The Kimchi is ready to eat right after mixing the ingredients. Of course, the prime factor is the fermentation. So there's that. But, how deeply fermented is to your taste. After the Kimchi is ready after standing at room temperature, place in refrigerator. It will continue to ferment under refrigeration, but slowly.
Enjoy. Serve small portions with savory meals. Branch out. Add some Kimchi to a simple soup. Some of the Kimchi liquid into a Bloody Mary. Also, there's the Cooky Cat original "Kimchi Cuties", the snack sandwich that will open even a Korean's eyes.
Also Important: If the amount you've prepared is more than the jars for fermenting, no problemo. Just put the overage amount in a container and refrigerate. Eat it right away, or later; it's delicious mixed right out of the bowl.
MIND THIS: The mass in your fermentation jar/container will expand due to the build up of Carbon Dioxide during the fermentation process. To avoid overflow, press it down daily to release some of the trapped CO2.
Tamogoyaki is a Japanese style omelette. It's "rolled". Not like a French omelette which is quickly and loosely scrambled into small curds then finished in the round pan into a graceful, sexy oblong shape. Or, scrambled all mushed up then shaped into that classic rectangular form. No cheating!
Tamagoyaki is formed a thin layer rolled upon a thin layer, then again and again. The rectagular shape is on account of the squarish pan used in it's preparation. Of course, you can use a round pan, but its cool to be square.
Rather than slogging through a lengthy master class worth of verbal description let's look at a video for starters ...
PS You'll also see in the last video at the end of this there's also lots of room for add-ins too.
That's a basic demonstration of the preparation. We'll mention some corrections in the following.
Tamagoyaki is delicious. Very tender, as you can imagine from the thin, lightly cooked layers. If you are interested in doing this at home this article will help get you started. Sharing some lessons we've learned along the way.
First is to decide on the pan. There are tons of non-stick versions. We don't go there anymore. So, the next choice is between a classic copper with tin lining, or cast Iron. We chose cast Iron for our first venture. The copper classic is a bit intimidating, but we're very tempted to try one too. I think I'm turning Japanese ...
Here is the cast Iron version we recommend. Ichiwa Iron Tamagoyaki omelette pan. 50 bucks on Amazon. Very well made in Japan. Once it's seasoned, it works like a dream. Best for a 3-4 large Eggs, or 3 extra-large.
The decision point on choice of pan spins around the size of the finished omelette. If you're preparing Tamagoyaki for breakfast, that pan serves two nicely. But, smalish portions. It's bottom size is 5" X 6". Or, if you have an appetite, make one, keep it warm, then make another. The process is a bit slower than is the French style. So think ahead if you're gonna make two and have them both arrive to table nice and warm. By the way, this style also makes for a great take from home lunch. Eats good room temperature.
For serving more than two, maybe consider the copper version. They are made in various sizes. Just be aware, the seasoning process with the tin lining is critical for a no stick result. Amazon also sells this type pan under the Japan made brand Tikusan. Looks well made. Seems like a good choice for a 3 or 4 family size would the the 7.1" X 7.1" at $85; or, the 8.3 X 8.3 for $100. If you go this way, know that the wood handle is set in place with a pin. Maybe better to use a very small round head brass screw. Admittedly that's a fussy point, but it's a point. If you stick with the supplied pin just be sure the wood handle is jammed good and tight into the copper receiver before setting the pin. It's no fun with a wobbly handle.
One other piece of equipage is with what do you turn the roll in the pan. We use a wide silicone Tamagoyaki spatula. Also available on Amazon. If you watch a number of other videos on the preparation you'll see the pros using chop sticks and flipping the pan to get the roll into shape. The cast Iron pan is a way bit too heavy for such maneuvers. The Copper is lighter, therefore more workable for that. The flip isn't necessary, it's just an efficiency the pros learn making them so often.
We'd say that the ideal way to get into Tamagoyaki is the cast Iron pan first, then graduate to the Copper. But, it is an expense, and how many times are you gonna make that omelette? But, believe us, once you try it, you'll come back for more.
Okay, you got your pan. Now what?
You'll see that the classic Tamagoyaki ingredients are Eggs and a thin liquid mix of Dashi broth, Mirin, and Soy sauce. Sugar too, but that is entirely optional, and a matter of taste. If you're preparing for Tamago Sushi, then the Sugar is de rigueur.
We are Westerners and not so culturally steeped that we consider the Dashi a must. We don't prepare this dish that often and making Dashi soup stock is a bit extra — Bonito flakes and Kombu; or, even instant Dashi powder — and it's not an element we feel makes or breaks the dish. Instead, we use one (1) Tablespoon of water per Egg and a nice spritz of Soy/Tamari and another of Mirin. Don't even know if those two are necessary. But the extra liquid factor seems to be a must. For more on that subject, go fetch. There's plenty online. And, of course, your own taste is what you have to please. Eggs, no matter where in the world, are just fine prepared simple and plain.
What now?
When you watch enough videos on the making of Tamagoyaki you'll notice a few must-do's. After the pan is seasoned, a thin layer of neutral flavor oil is swabbed on. We use Peanut Oil. You choose your choice. And, after each layer is rolled up the entire pan is once again oiled. Entire. The top portion, move the formed egg back up, then the bottom. So do that. You don't want the egg layer to stick, or get browned. If it does brown, Tango on and hide it into the next fold. And, if the whole thing gets browned serve it enthusiastically, without any tableside confessions or apologies. What goes on in the kitchen ...
Side bar: As told to me ... at Thanksgiving dinner the maid enters the dining room through the kitchen door and then accidentally drops the Turkey onto the floor in front of all the seated guests. The hostess, without skipping a beat, says, "Please take that one back and bring out the other one". Lesson: the old-timers kept a kitchen behind a closed door for good reason. Again ... what goes on in the kitchen, stays in the kitchen.
Just have to say it ... who thought up the "open" kitchen? No doubt someone who likes the aroma of Bacon permeating the entire house in the morning. Coffee, well who doesn't like that? This Cat knows what he likes, you can bet on that!
The next thing to be fussy about is the amount of liquid you pour into the pan at each step. In the video up front we'd say there was a way bit too much. Pour enough for the layer to set up fairly quickly, not so much that you have to wait and/or scramble it to get it going. You don't, however, have to ever wait until the layer is fully set. A little slick wetness is fine; it'll set up as it goes.
As was said, we use a wide silicone spatula. The width makes it handy for the flips. It's up to you though. You may use the spatula you have on hand, or go full on Nippon and use chop sticks.
But, please, don't go full-on "Nippon Nuts". There is a soul to any cuisine; but, as they say, "Saffron robes don't make the monk". Get some skills first. Then when you earn your chops you can dress up.
That's it. Please look at some more videos. Believe us, the order of events making this dish is specific. More than once we've had to stop and figure out like which end of the pan does each successive roll go to. It's a practiced thing. Basic procedure: into a well oiled pan over medium heat — a thin layer of the Egg liquid — you roll from top to bottom — oil the pan again — push the roll to the top— add egg mixture — lifting top roll to get egg mixture underneath — then roll top to bottom again. And, so forth.